
A website migration is one of the riskiest things you can do to your organic traffic, and one of the most common. Businesses move from HTTP to HTTPS, change their domain after a rebrand, switch from a custom CMS or Wix to WordPress, change hosting, or redesign the site and change URLs along the way. Done well, Google follows you to the new address and rankings settle. Done carelessly, months of traffic and enquiries can disappear while everyone wonders why.
This website migration SEO checklist walks through every stage: deciding what kind of migration you are doing, preparing the new site, building a redirect map, launching, using the Search Console Change of Address tool when it applies, and monitoring the move afterwards. It is based on Google’s own site move documentation, plus the practical checks we run on client migrations.
Key takeaways
- Work out which type of migration you are doing first. HTTPS, domain, platform, hosting and redesign moves need different steps.
- Google recommends server-side permanent redirects (301 or 308) from each old URL to its new equivalent, redirecting directly to the final URL rather than through chains.
- Don’t redirect many old URLs to the home page. Google says this can confuse users and may be treated as a soft 404.
- Use the Change of Address tool in Search Console only for domain or subdomain moves, not for HTTP to HTTPS or path changes.
- Keep redirects for as long as possible, generally at least one year, and expect rankings to fluctuate for a while. Google says a medium-sized site can take a few weeks or more to settle.
What counts as a website migration?
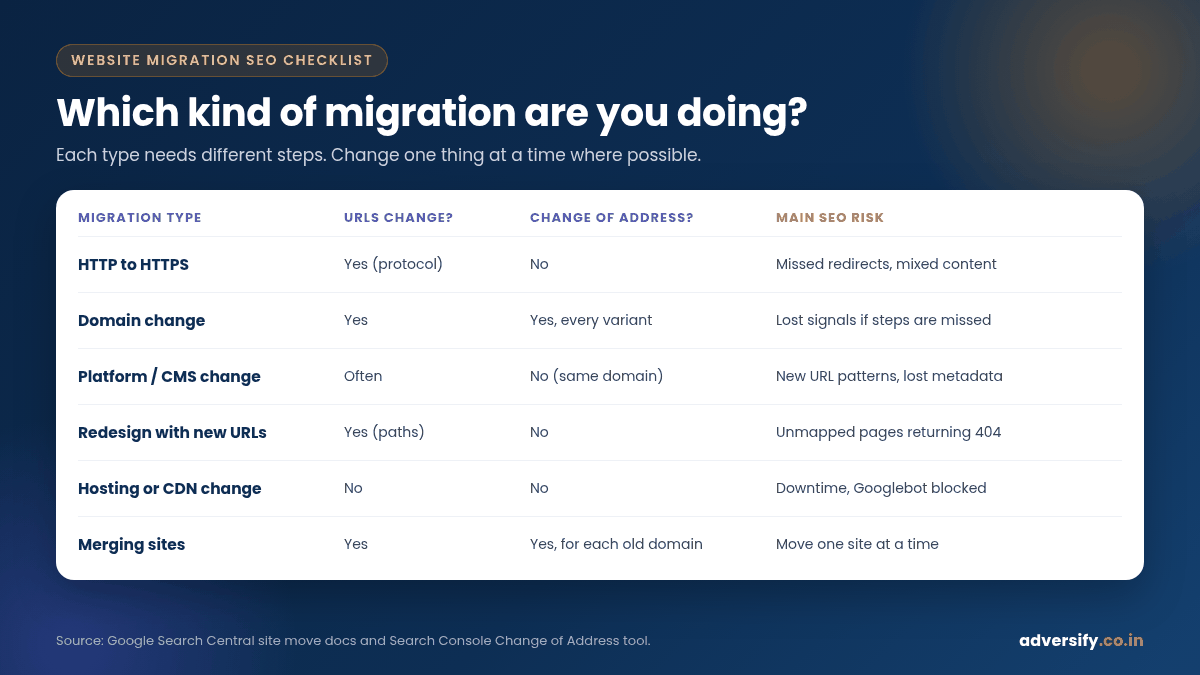
“Migration” is used loosely, but from an SEO point of view it means any change that affects how search engines find, crawl or index your pages. Google’s documentation separates moves that change URLs from moves that don’t (Google Search Central: How to move a site).
| Migration type | Example | URLs change? | Change of Address tool? | Main SEO risk |
|---|---|---|---|---|
| HTTP to HTTPS | http://example.in to https://example.in | Yes (protocol) | No | Mixed content, missed redirects, old canonicals |
| Domain change | oldbrand.in to newbrand.com | Yes | Yes | Lost signals if redirects or Search Console steps are missed |
| Platform / CMS change | Custom PHP or Wix to WordPress | Often | No (same domain) | New URL patterns, lost content and metadata |
| Redesign with URL changes | /services.php?id=4 to /seo-services/ | Yes (paths) | No | Unmapped pages returning 404 |
| Hosting or CDN change | New server, same URLs | No | No | Downtime, firewall blocking Googlebot, slow server |
| Merging sites | Two brand sites into one | Yes | Yes, for each old domain | Consolidation confusion; move one site at a time |
Google’s advice is to change one thing at a time where possible. If you want a new domain, a new CMS and a new design, Google suggests doing them one after the other rather than all at once. That makes it much easier to find the cause if traffic drops. If a redesign is part of your plans, our guide to website redesign services in India covers how to keep a redesign SEO-safe.
Phase 1: Plan the migration
Step 1: Define the scope and set a date
Write down exactly what is changing: domain, protocol, CMS, URL structure, design, hosting, or a combination. Pick a launch date during a quieter period for your business if you can. Google suggests timing moves to coincide with lower traffic, so fewer people are affected by any issues and more server resources are available for Googlebot.
Step 2: Record a baseline
Before anything changes, export and save:
- Search Console performance data (queries and pages) for the last 16 months
- Google Analytics landing page traffic and conversions
- The list of indexed pages and any errors in the Page indexing report
- Rankings for your most important keywords
- Your top pages by backlinks, from the Links report in Search Console
Without a baseline, you can’t tell after launch whether a change is normal fluctuation or a real problem.
Step 3: Build a complete URL inventory
Google suggests starting with your important URLs: those in your sitemaps, pages with the most traffic in your server logs or analytics, and pages with internal and external links in Search Console. Then add everything else your CMS knows about. Don’t forget images, PDFs, videos, CSS and JavaScript files, because Google notes that embedded content needs to move in the same way as pages.
A crawler such as Screaming Frog, which Google mentions in its own migration resources, makes this much faster for anything beyond a small site.
Step 4: Verify everything in Search Console
Verify both the old and new sites, including all variants: www and non-www, HTTP and HTTPS. Make sure your verification method will survive the move. If you verify with an HTML file or a meta tag in your theme, it must be present on the new site too.
Phase 2: Prepare the new site
Step 5: Build and test on staging
Build the new site on a staging copy and test every page, form and download. Many teams block crawling or add noindex during development. Google says that is fine, but you must plan exactly what robots.txt should look like at launch and keep a list of the URLs where you’ll remove noindex. A forgotten noindex is one of the most common and damaging migration mistakes.
Step 6: Carry over the SEO elements
- Title tags and meta descriptions for every important page
- Headings and body content, especially on pages that rank today
- Image alt text
- Structured data, updated to the new URLs
- Internal links, updated to point directly at new URLs
- hreflang annotations, if you run multilingual pages
Google also says each new URL should have a self-referencing rel="canonical" tag. Our guide to internal linking for WordPress explains how to rebuild link structure on a new WordPress site.
Step 7: Handle deleted and merged content properly
If some old pages are not coming across, Google says they should return a 404 or 410 status on the new site. If several old pages have been merged into one, it is fine to redirect them all to the new consolidated page.
Step 8: Check a new domain’s history
If you have bought a domain, check for manual actions or leftover URL removals from the previous owner in Search Console before you move, and fix them first.
Step 9: Make sure the server can cope
Google says it will temporarily crawl a migrated site more heavily than usual. If your hosting is weak, warn your host or upgrade before launch.
Phase 3: Build the redirect map
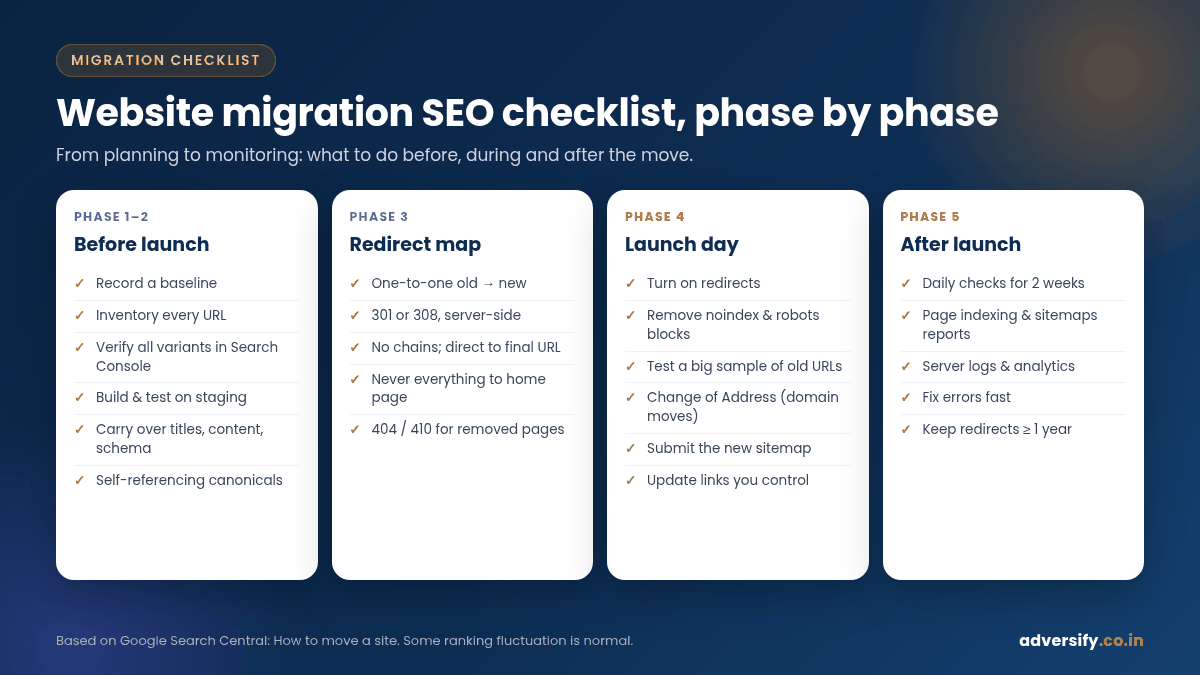
The redirect map is the heart of any migration. It is a spreadsheet with every old URL in one column and the single best new URL in the next.
Step 10: Map one-to-one wherever possible
Each old page should redirect to its closest equivalent on the new site. Google specifically warns against redirecting many old URLs to one irrelevant destination, such as the home page, because it can confuse users and might be treated as a soft 404.
Step 11: Use the right redirect type
Google recommends server-side permanent redirects, such as HTTP 301 or 308, whenever possible. Its redirects documentation explains that permanent redirects signal the target should be shown in search results, while temporary redirects such as 302 or 307 tell Google to keep showing the source page (Google Search Central: Redirects and Google Search). JavaScript redirects should only be used if server-side or meta refresh redirects aren’t possible. Google also says 301 and other permanent redirects don’t cause a loss in PageRank.
Step 12: Avoid redirect chains
Googlebot can follow up to 10 hops in a chain, but Google advises redirecting straight to the final destination. If that isn’t possible, keep chains short, ideally no more than three. If your old site already had redirects in place, update them to point directly at the new final URLs.
| Old URL | New URL | Redirect | Notes |
|---|---|---|---|
| http://oldbrand.in/services.php?id=4 | https://newbrand.com/seo-services/ | 301 | Direct, no chain via https://oldbrand.in |
| http://oldbrand.in/blog/post-123 | https://newbrand.com/blog/local-seo-tips/ | 301 | Same content, new slug |
| http://oldbrand.in/offer-diwali-2023 | None | 410 | Expired offer, no equivalent |
| http://oldbrand.in/seo-noida and /seo-delhi | https://newbrand.com/local-seo/ | 301 | Merged into one consolidated page |
The rows above are an illustrative format, not a real client map.
Phase 4: Launch day
Step 13: Turn on the redirects and remove the blocks
Activate the redirects, then immediately remove any staging noindex tags and development robots.txt rules. Check that the robots.txt on the new site allows crawling of the pages you want indexed. If you don’t have a robots.txt file at all, Google says that is fine, as long as the URL returns a proper 404.
Step 14: Test the redirects
Test a large sample of old URLs, including your top traffic pages and top linked pages. Google suggests the URL Inspection tool for individual URLs and command-line tools or scripts for large numbers (Search Console Help: URL Inspection tool). Each old URL should return a single 301 or 308 to the correct new URL, which then returns 200.
Step 15: Submit a Change of Address, if you changed domain
The Change of Address tool tells Google your site has moved from one domain or subdomain to another (Search Console Help: Change of Address tool). Key points from Google’s documentation:
- Use it for domain or subdomain moves, such as example.com to example.org. Don’t use it for HTTP to HTTPS, www to non-www, path changes within the same site, or hosting changes with no URL change.
- You must be an owner of both properties, using the same Google account.
- Submit it for every verified variant of the old domain, including www and non-www, even ones you don’t actively use.
- The tool runs checks, including whether a few pages return 301 redirects, before it accepts the move.
- Google says the change of address continues for 180 days. Keep redirects for at least that long, and keep paying for the old domain for at least a year so nobody else can buy and misuse it.
Step 16: Submit the new sitemap
Submit an XML sitemap containing the new URLs in Search Console. Google’s migration guide also suggests keeping a sitemap of the old URLs available for a while, so you can watch indexing shift from old to new. Warnings about redirecting URLs in the old sitemap are expected.
Step 17: Update links you control
Update internal links, your Google Business Profile website link, social profiles, email signatures and ad campaign landing pages. Then contact the most important external sites linking to you and ask them to update their links.
Phase 5: Monitor after launch
Step 18: Watch Search Console closely
For the first two weeks, check daily, then weekly for the next few months. Focus on:
- Page indexing report: indexed pages should fall on the old site and rise on the new one. Look for spikes in “Not found”, soft 404 or redirect errors (Search Console Help: Page indexing report).
- Sitemaps report: the new sitemap’s indexed count should gradually increase.
- Performance report: impressions and clicks should move from old URLs to new ones.
Step 19: Check server logs and analytics
Look for Googlebot crawling the new URLs, unexpected error status codes and real user traffic. Compare landing page traffic and conversions against your baseline.
Step 20: Fix problems quickly
The most common post-launch problems Google lists are leftover noindex or robots.txt blocks, redirects pointing to wrong or non-existent URLs, crawl errors, insufficient server capacity and sitemaps that weren’t updated. Fix any of these as soon as they appear.
Step 21: Keep the redirects
Google recommends keeping redirects for as long as possible, generally at least one year, so it can transfer all signals and recrawl links from other sites. From a user’s point of view, it suggests considering keeping them indefinitely.
Special case: hosting moves with no URL change
If you are only moving to a new host or CDN and your URLs stay the same, the process is simpler. Google’s guidance for changing hosting is to copy and test the site on the new infrastructure, check that Googlebot can reach it (and that your firewall or DoS protection doesn’t block it), lower your DNS TTL in advance, remove any temporary crawl blocks, then update DNS and monitor both old and new servers before shutting the old one down (Google Search Central: Changing your hosting).
Special case: HTTP to HTTPS
An HTTPS move is a site move with URL changes, so the same redirect and monitoring steps apply. Redirect every HTTP URL to its HTTPS equivalent with a 301, update canonicals, internal links, sitemaps and structured data to HTTPS, and fix any mixed content (images or scripts still loading over HTTP). You don’t need the Change of Address tool; Google says it will figure the change out for you.
How long does a migration take to settle?
Google says that for medium-sized sites it can take a few weeks or more for Google to start showing the new URLs instead of the old ones, and longer for large sites. The speed depends on the number of URLs and how fast your server is. Ranking fluctuations during this period are normal. A sustained drop after a couple of months, though, usually points to a specific problem: missing redirects, lost content or a technical block.
Frequently asked questions
Will I lose rankings when I migrate my website?
Some temporary fluctuation is normal. A well-planned migration with complete one-to-one redirects, preserved content and no accidental blocks usually limits the long-term impact. No one can guarantee that rankings will be unaffected.
Should I move all pages at once or in sections?
Google recommends moving small and medium sites all at once, which helps its systems detect the move faster. Large sites can move one section at a time to make problems easier to spot.
Is a 302 redirect okay for a migration?
Not for a permanent move. A 302 is a temporary redirect, so Google may keep showing the old URL. Use a 301 or 308.
Do I need to update my Google Business Profile after a domain change?
Yes. Update the website link on your profile so it points to the new domain directly rather than through a redirect.
Can I remove the old domain once the move is complete?
Keep the redirects for at least a year if you can, and keep renewing the old domain. Letting it lapse means anyone can buy it, and your redirects stop working.
What should I check before switching from Wix or a custom CMS to WordPress?
Export a full URL list, plan how WordPress permalinks will map to the old URLs, check that all content, images and metadata come across, and set up redirects for every URL whose path changes. Keep the old site accessible until the redirects are tested.
Planning a migration? Get it checked first
A migration is far cheaper to get right before launch than to fix afterwards. Our team in Noida and Hauz Khas, New Delhi can build your URL inventory and redirect map, review your staging site and monitor Search Console after launch, as part of our SEO services or alongside a website design project. Ongoing website maintenance keeps redirects and plugins in order after the move. Request a free SEO audit before you migrate, and we’ll tell you what to protect.
2 Responses